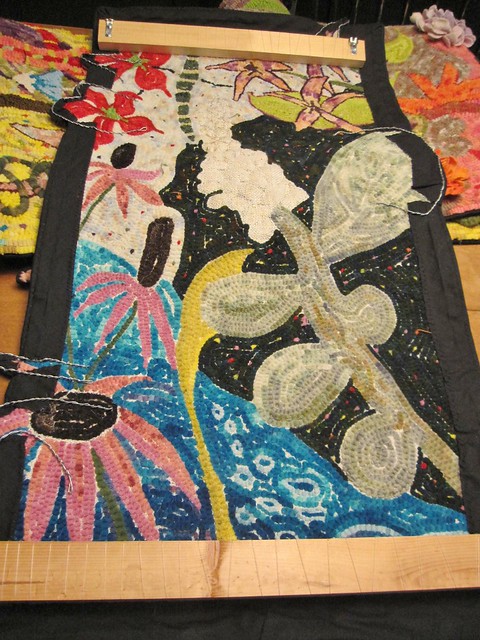
Well, that’s a good thing in my case!
As for the “sewing story”…….

I went to the fabric store, bought some black linen,
brought it home and got out all my “tools” to make pockets
for the back of my garden rugs, which would then house
this piece of wood…..one piece of wood on the top, one piece of
wood on the bottom, to weight the rug.
I measured, I measured again, I cut, I sewed, I swore, I sewed
some more. I hand stitched the pocket onto the back of one
of the rugs….one irritating stitch at a time. I stitched, I stuck
myself, I bled, I persevered and I got the frickin’
pocket sewn onto the back of one of the garden rugs.
I threaded the piece of wood through the pocket and I hung it against
the wall to see how it was looking before I sewed on the
pocket on the bottom edge of the rug.
)(*#$)@(#Y$)@(#*$)@(*#$
The pocket with the wood in it, made the rug pucker and it just
looked BAD…..I tried not to cry over all the time I had spent
doing all of this…..I bit my lip…..perhaps if I just sew the piece of
wood directly onto the back of the rug on the bottom, I can save
myself a lot of time and see if this is going to look any better
once the rug is weighted at the bottom.
Piece of wood
Fishing line
Needle
Oh the stitching is going quite quickly….this is good, I think to myself!
I get the bottom piece stitched on and hold the rug up to the wall…..
)(@*#$)(@#*@)#(*$
The top STILL puckers…even with the weight of the wood along the bottom.

I stop
I do some deep breathing
think
Tammy
think

Aha!
Sewing that piece of wood directly to the rug was
so easy……and I’ve been making this waaaay
too hard!
I got out my little scissors…..I snipped and snipped
and snipped some more…..ahhhh, the sheer pleasure
of pulling out all of those tiny irritating threads that
I had stitched so carefully one by one, to stitch on the
100% linen pocket……
gone
done
finito!
Now I was like a woman possessed!
I sewed and I sewed and I sewed….but this time it was
different……
Me, the needle and the fishing line were as one!
I had the piece of wood at the top stitched directly to the rug
.
.
.
I placed it against the wall……
.
.
.
it didn’t pucker!
(Insert singing of angels)


I hope to have these “installed” over the holiday
weekend!
I’d love to hear your questions and comments about
this process. I’ve worked tirelessly with a framer
who is quite knowledgeable about the archival process.
Many things were taken into consideration and I
hope to discuss some of those things in some of my
upcoming posts.

Tammy ~
ReplyDeleteVery clever!
Hugs :)
Lauren
Ah Tammy..............I love you to death! You are one tough cookie.
ReplyDeleteBUT..............
Why did you not just cut a couple pieces of carpet tack strip and slip the rug onto it???? That's how I hang all my rugs. Then if you needed to tweak a corner, here or there............you could just hide a few straight pins with glass heads, that you insert into the rug with pliers.
Everything hung in my house is either done by straight pins or carpet tack strip.
SERIOUSLY.
xoxoxoxoxoxoxoxoxoxox
Hooray for perseverance!! Can't wait to see your installation! Your rugs are awesome!
ReplyDeleteWow Tammy I am glad it has worked. If you ever want a really easy way to mount rugs foam board works like a dream. I buy black foam board, cut it to the size of the rug and baste the rug on it. Then I nail it to the wall. Totally flat.
ReplyDeleteVery clever indeed. And that is what I'll do when I get ready to hang my Sheep over my mantle! Thanks Tammy.
ReplyDeleteI'm with Ter'e and the carpet strips - are the rugs too heavy for that? but very smart the way you did it! Good luck with the installation and hope you can sit back and really enjoy your rugs!
ReplyDeleteWOOOOHOOO!!!! Standing and cheering for you girl!! I know that feeling and those trials and errors all too well! LOL Sucks when you're there. But the feeling you get after pushing thru until you BEAT IT and WIN and have a finished project worth being proud of is worth all of it! :D Way to go!! xoxo
ReplyDelete