trying to get myself psyched to go back to work
after 10 days off…..


Whether you’re on the road….

Or staying at home….

Whether it’s raining…..

Or shining….

Whether you’re with lots of people…..

Or on your own….

Whether you’re in the country…..

Or in the city….

Celebrate Freedom!
YAY! This makes me smile!
I check every day on the dogs who are featured
on my blog sidebar…..I’ve been rooting for this girl,
since she looks so much like my Cleopatra!


Best wishes to you Stormy!

Ah, the carpet tacking strip question/statement…….
Yes, the archival framer and I talked about this quite a bit……
He was horrified to learn that this is such a common method of
hanging rugs….
The carpet tacking strips will play h*ll with your rugs over the long term…
The nails are not galvanized and will rust….
Plus the sharp nails and nail edges cut at the fibers of the rug…..
The wood is not sealed and the acids from the wood will also eat away at the wool fibers…..
Kind of reminds me of this……
Have I hung rugs using carpet tack strip…….yes
Do I have any rugs currently hung using carpet tack strip…..yes
Am I searching for a better method…..yes

So what started all of this experimentation?
I wanted a way to hang my rugs with just a few nails in the wall,
where I could take the rugs down and they would also be suitable
for hanging in gallery showings.

I’ve only done two showings and once the rugs are there it is a
nightmare to figure out how to hang the rugs.

Galleries don’t exactly want you nailing carpet tacking strips to their walls.

He (the framer) had me use the thicker wood strips to keep the rug from hanging flush
to the wall (I requested a method where the rugs would hang flush to the wall)…..when it
hangs flush, it easily traps moisture, which can also be damaging to the rug AND the wall….
in the form of moisture and mold. When the rug is hung a bit away from the wall it lets air
circulate around the front and the back of the rug.
For most rugs, you would probably not need the wood along the bottom
of the rug as well, however, for these particular rugs…..they had lots of
embellishing which needed to be weighted at the bottom to have the rugs
hang correctly.
In the future we will also be experimenting with Velcro and perhaps an innovate
way to hang smaller rugs with galvanized or stainless steel wire…..I’ll let you know
how these come along as I work on them.
We put so much time and effort into our rugs….I think it’s time we start thinking more
about how we hang them as well.


Well, that’s a good thing in my case!
As for the “sewing story”…….

I went to the fabric store, bought some black linen,
brought it home and got out all my “tools” to make pockets
for the back of my garden rugs, which would then house
this piece of wood…..one piece of wood on the top, one piece of
wood on the bottom, to weight the rug.
I measured, I measured again, I cut, I sewed, I swore, I sewed
some more. I hand stitched the pocket onto the back of one
of the rugs….one irritating stitch at a time. I stitched, I stuck
myself, I bled, I persevered and I got the frickin’
pocket sewn onto the back of one of the garden rugs.
I threaded the piece of wood through the pocket and I hung it against
the wall to see how it was looking before I sewed on the
pocket on the bottom edge of the rug.
)(*#$)@(#Y$)@(#*$)@(*#$
The pocket with the wood in it, made the rug pucker and it just
looked BAD…..I tried not to cry over all the time I had spent
doing all of this…..I bit my lip…..perhaps if I just sew the piece of
wood directly onto the back of the rug on the bottom, I can save
myself a lot of time and see if this is going to look any better
once the rug is weighted at the bottom.
Piece of wood
Fishing line
Needle
Oh the stitching is going quite quickly….this is good, I think to myself!
I get the bottom piece stitched on and hold the rug up to the wall…..
)(@*#$)(@#*@)#(*$
The top STILL puckers…even with the weight of the wood along the bottom.

I stop
I do some deep breathing
think
Tammy
think

Aha!
Sewing that piece of wood directly to the rug was
so easy……and I’ve been making this waaaay
too hard!
I got out my little scissors…..I snipped and snipped
and snipped some more…..ahhhh, the sheer pleasure
of pulling out all of those tiny irritating threads that
I had stitched so carefully one by one, to stitch on the
100% linen pocket……
gone
done
finito!
Now I was like a woman possessed!
I sewed and I sewed and I sewed….but this time it was
different……
Me, the needle and the fishing line were as one!
I had the piece of wood at the top stitched directly to the rug
.
.
.
I placed it against the wall……
.
.
.
it didn’t pucker!
(Insert singing of angels)
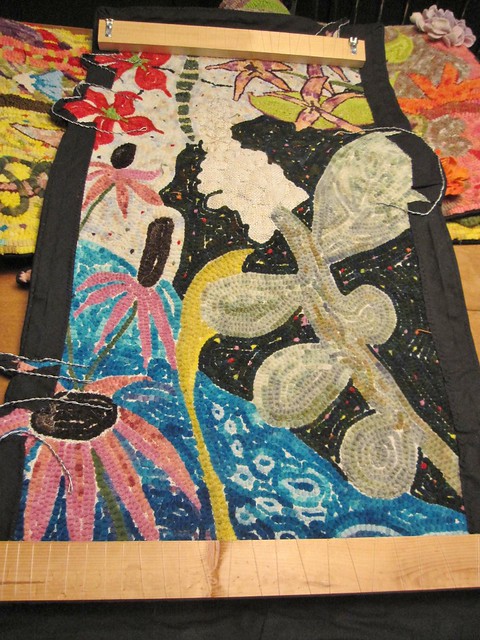


I hope to have these “installed” over the holiday
weekend!
I’d love to hear your questions and comments about
this process. I’ve worked tirelessly with a framer
who is quite knowledgeable about the archival process.
Many things were taken into consideration and I
hope to discuss some of those things in some of my
upcoming posts.
From Scrap to Art
This artist makes sculpture from scrap metal and
scrap utensils and such……intriguing! Of course I loved
the hound dog!


Want to see more….go HERE
**************************************
For those of you who have been asking about Cleopatra,
she is doing fine. She had a cyst removed and has several
staples and a drain. The drain comes out Saturday morning,
and the staples the week after that. Her vet says she is one
of the best patients they have had. She will let them do
anything to her that needs to be done without complaint.
They even let her come home without the “cone of shame”.
She occasionally licks at the drain and her incision, but she doesn’t
try to pull anything out.
My little patient resting comfortably….

Her staples and drain…..

Oh yeah, I still have to share about my sewing
escapades….will try to do that later today or
tomorrow.


Baby robins in our front yard……

so delicate….they look like they are not “done”.
Nestled into the blue atlas cedar tree, hidden from view
unless you really look for them.


Such a beautiful and perfect nest. Have you ever
really “looked” at nests….they are amazing.


Mama/papa robin was not happy with me being so close to her/his babies…..

I never could get a good picture of her/him “on” the nest.
Yesterday I took a recipe from Bon Appetit magazine and tweaked it just a bit to make some popsicles……popsicles have become my summer addiction. I eat one every night!
For the original recipe go HERE.
My recipe is below, basically the same, but not quite.
Peach-Vanilla Cream Pops
makes 8-10
popsicle molds or Dixie cups and sticks
(my popsicle molds came from K-Mart)

Place sugar and 1/2 cup water in a small saucepan. Scrape in seeds from vanilla bean; add bean. Bring to a boil over high heat, stirring until sugar dissolves. Transfer syrup to a small bowl; chill. (I put my syrup in the freezer and let it chill while I did the next step)
Discard vanilla bean.
Purée syrup and peaches in a food processor until smooth. Whisk in remaining ingredients. Divide among molds. Cover; insert ice-pop sticks. Freeze until firm. Dip bottoms of molds into hot water for 20-30 seconds to loosen pops.
Remove pops from molds and serve.

Enjoy!

